


Chewy New York Style Bagels are even better when made with a sourdough starter. The sourdough discard adds depth of flavor and keeps the bagels fresh longer!

The idea of making homemade bagels may seem a bit intimidating, but bagel dough is denser (more flour) and easier to work with than normal bread dough.
To make it even easier I made a full video tutorial that you can find in the recipe card below. If you have any questions I would love to help!
These bagels use yeast and sourdough starter. They are mild and delicious in flavor and done in about 2 hours. Although they are not purely sourdough they still have a beautiful soft and chewy inside!
These easy sourdough bagels are my most requested gift to give to friends. I have even been asked to make several dozen for brunches!
They are naturally vegan! No crazy ingredients to substitute! Top with vegan cream cheese or butter. Or try these Plant Based Bagels without a sourdough starter.
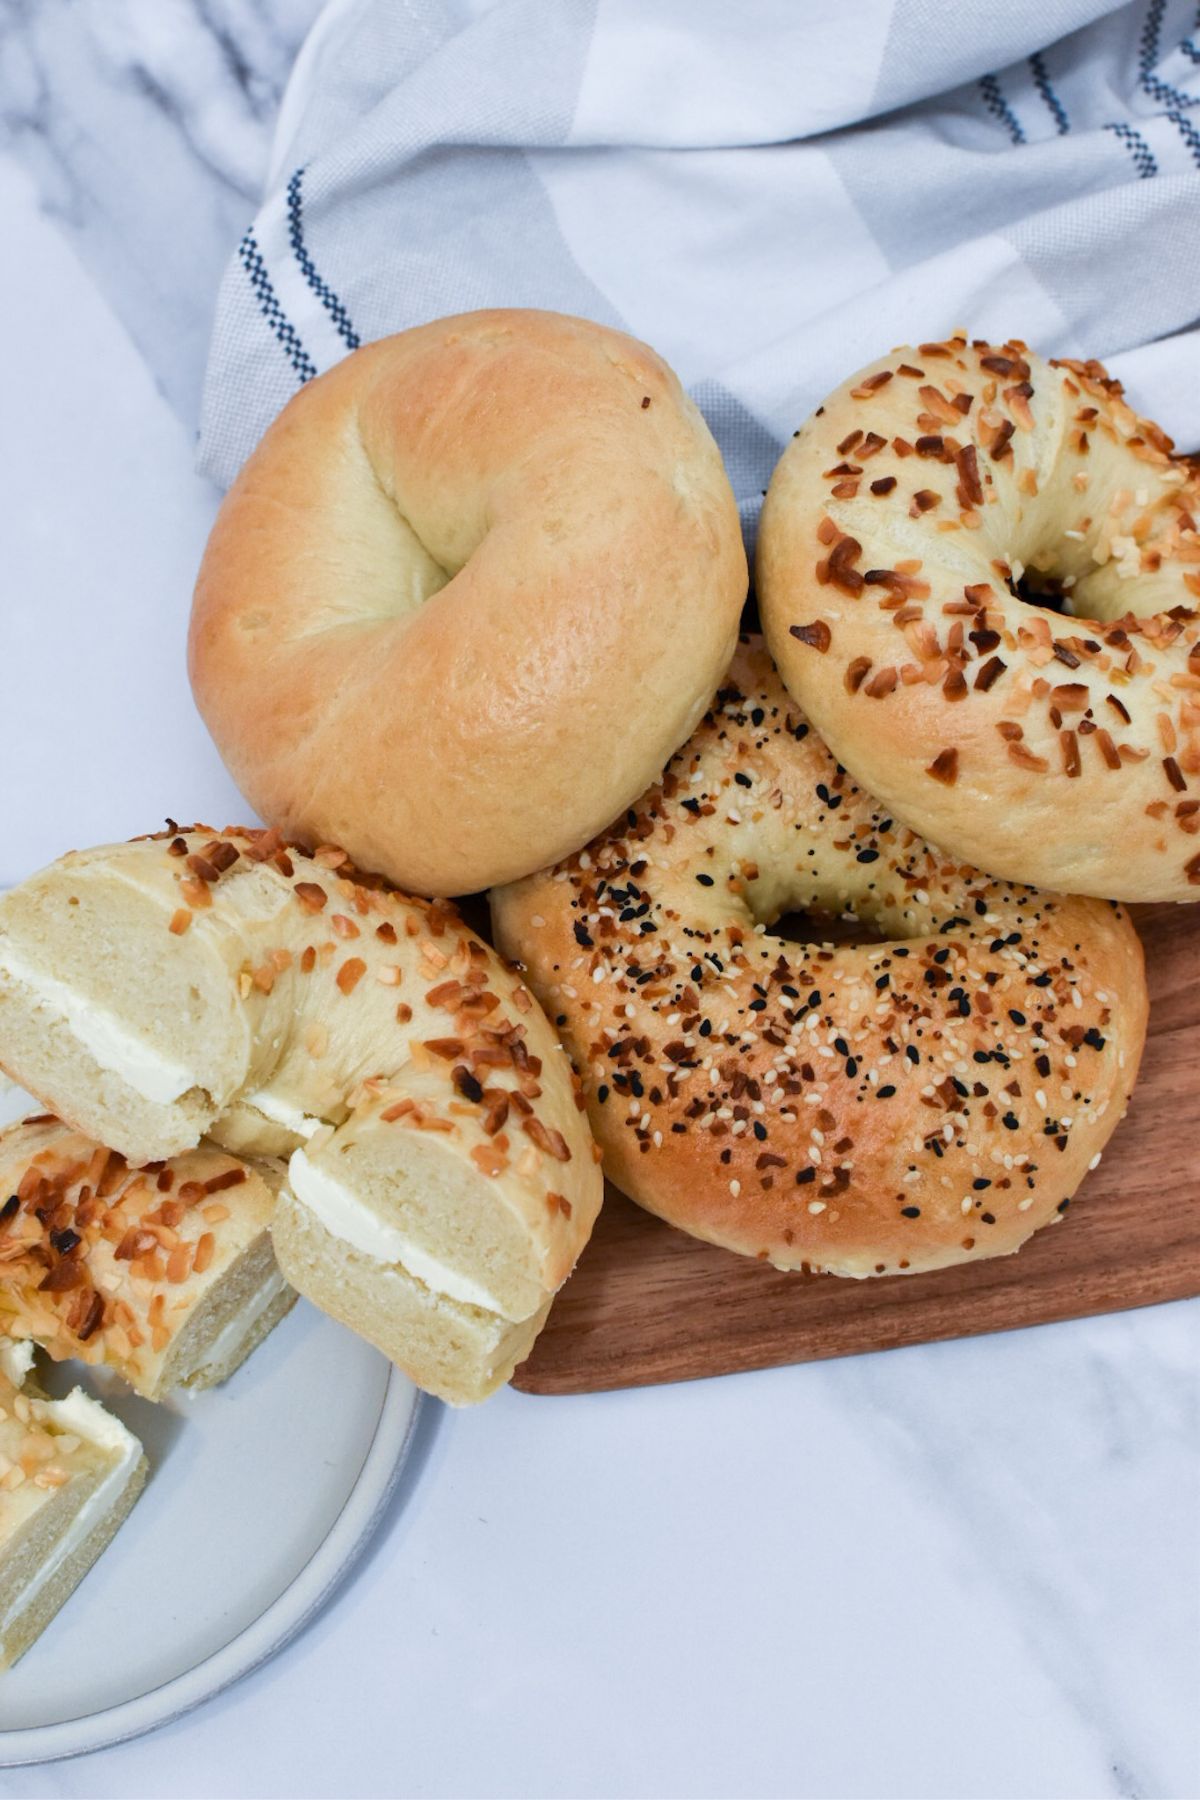
Have you tried a New York style everything bagel with cream cheese, lox (smoked salmon) and a slice of tomato? They are divine!
Why You'll Love This Recipe
- The bagel are chewy on the outside and soft and on the inside!
- The dough is not sticky at all and so easy to work with!
- These will miles better than the store bought bagels.
- You can customize them with your favorite toppings!
Recipe Ingredients

You'll need the following ingredients to make New York Style Sourdough Discard Bagels.
Flour: Bread flour or a flour with higher wheat protein will yield chewier bagels. King Arthur bread flour or King Arthur all purpose flour are great.
Water
Sourdough Discard: These will take your mediocre homemade bagels and make them magnificent. The discard adds flavor and longevity to the bagels!
Sugar: Helps feed the yeast.
Yeast: Hands down my favorite yeast is SAF Instant Yeast. I use it in all my bread!
Salt: Brings out the flavor.
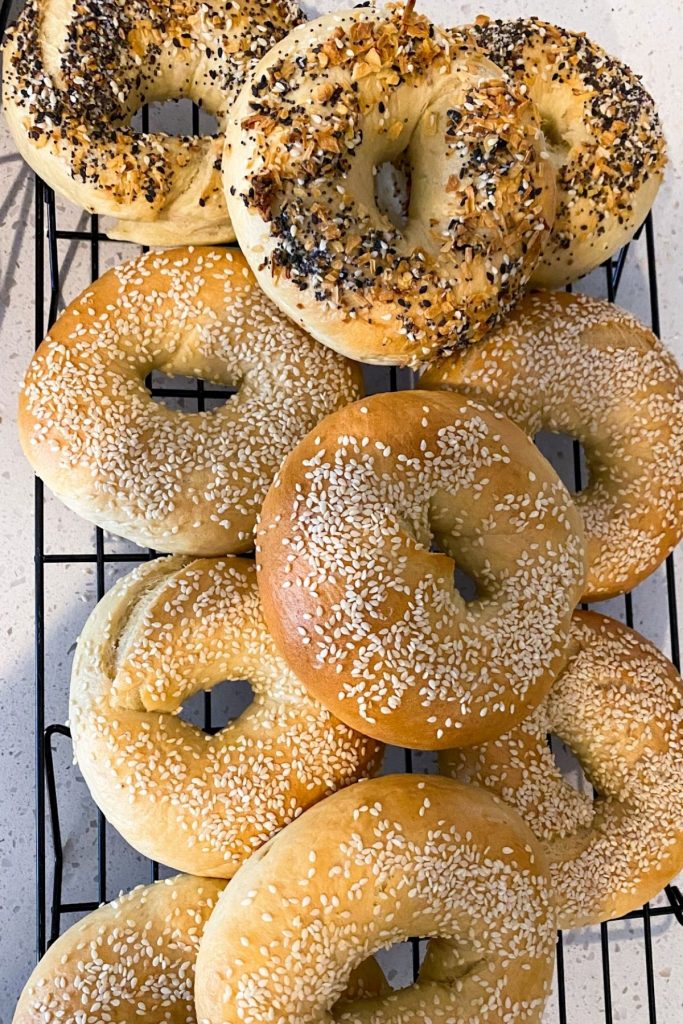
Optional Toppings: everything seasoning, dried onion flakes, sesame seeds, poppy seeds, coarse salt.
How to Make Bagels
Here are some quick instructions. The full recipe with ingredient measurements is below! Also, check out the full tutorial video in the recipe card!
Add the water, flour, yeast, salt and sugar to the mixer. Knead for at least 10 minutes.

Take the dough out of the mixer and shape it into a ball.
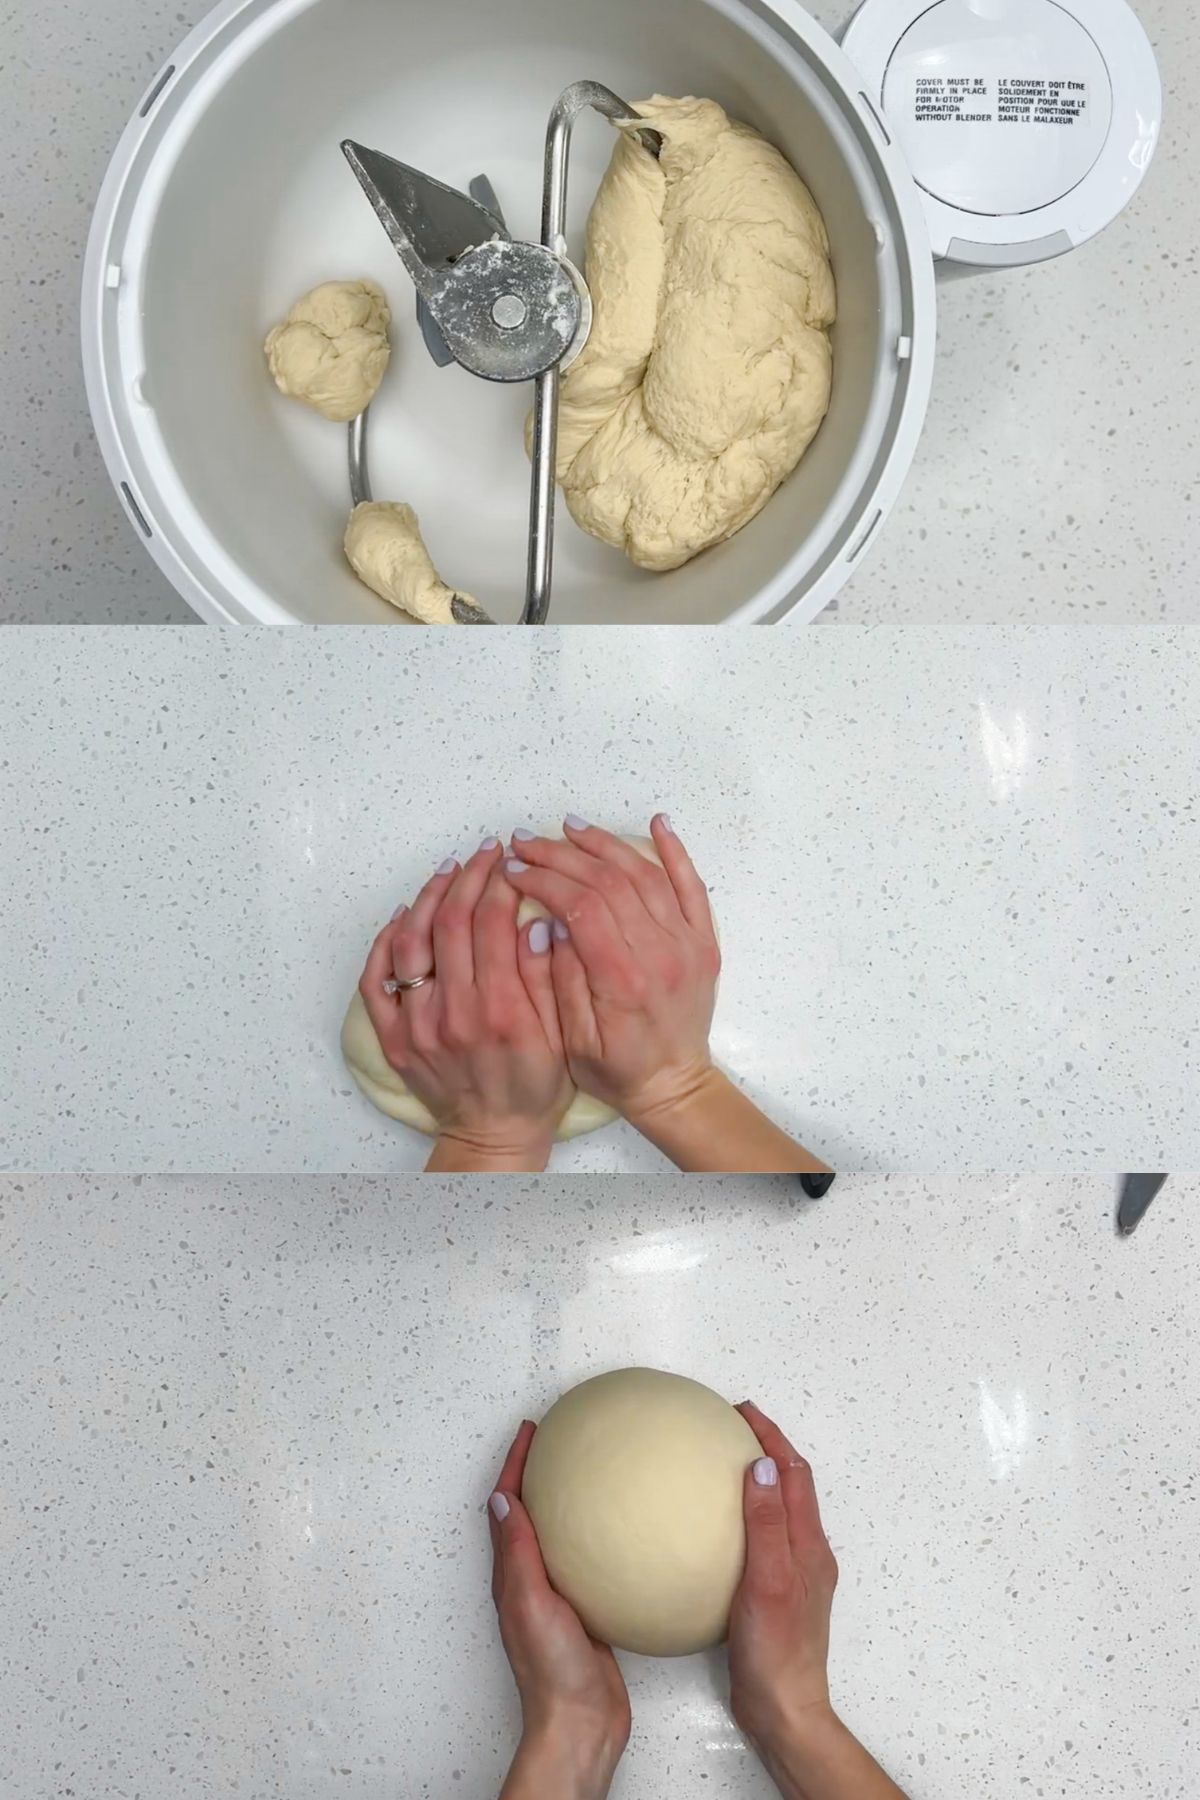
Put the dough in a large bowl, cover with plastic wrap and rise.

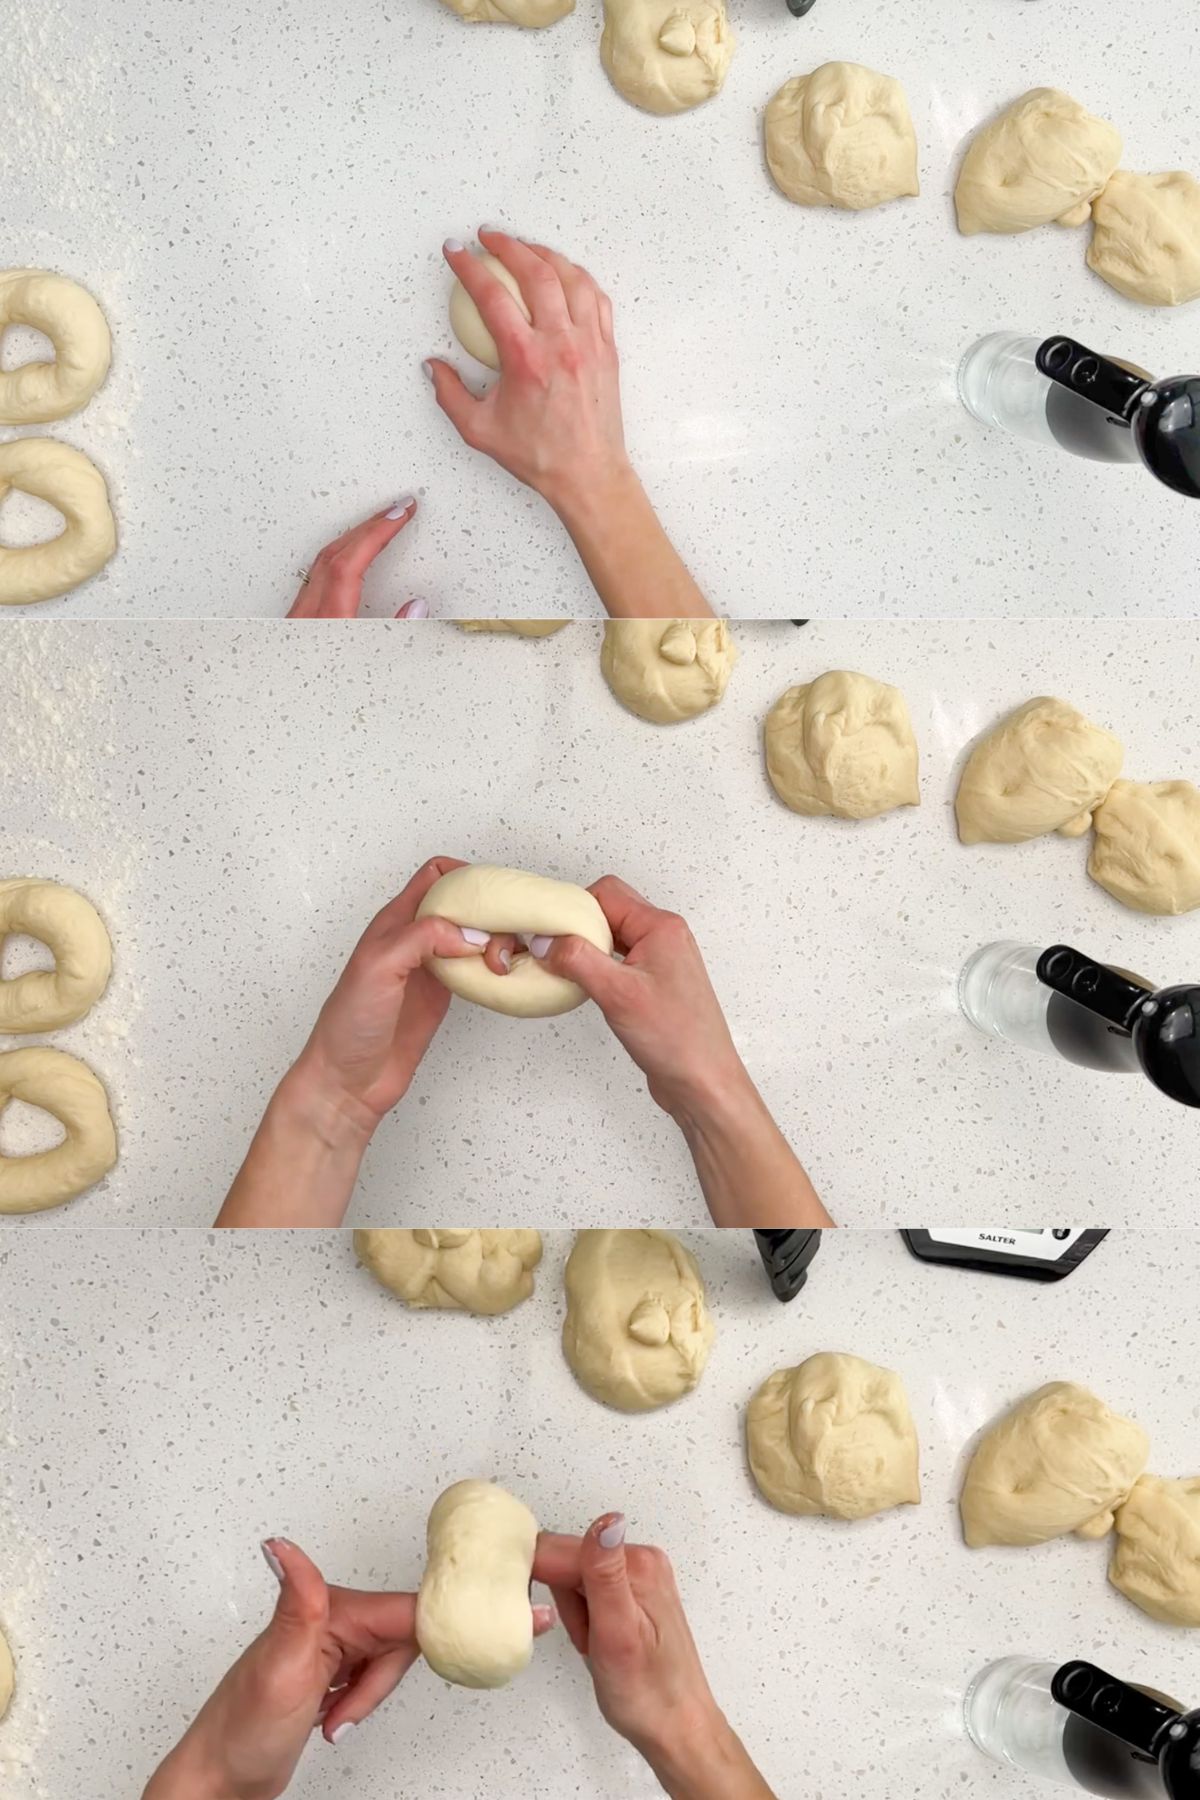
Cut the dough into 8-12 pieces depending on the desired size of the bagels. Generously flour a clean surface for the shaped bagels to rest on.

There are two methods to shape the bagels. The video tutorial in the recipe card will be VERY helpful with shaping the bagels.
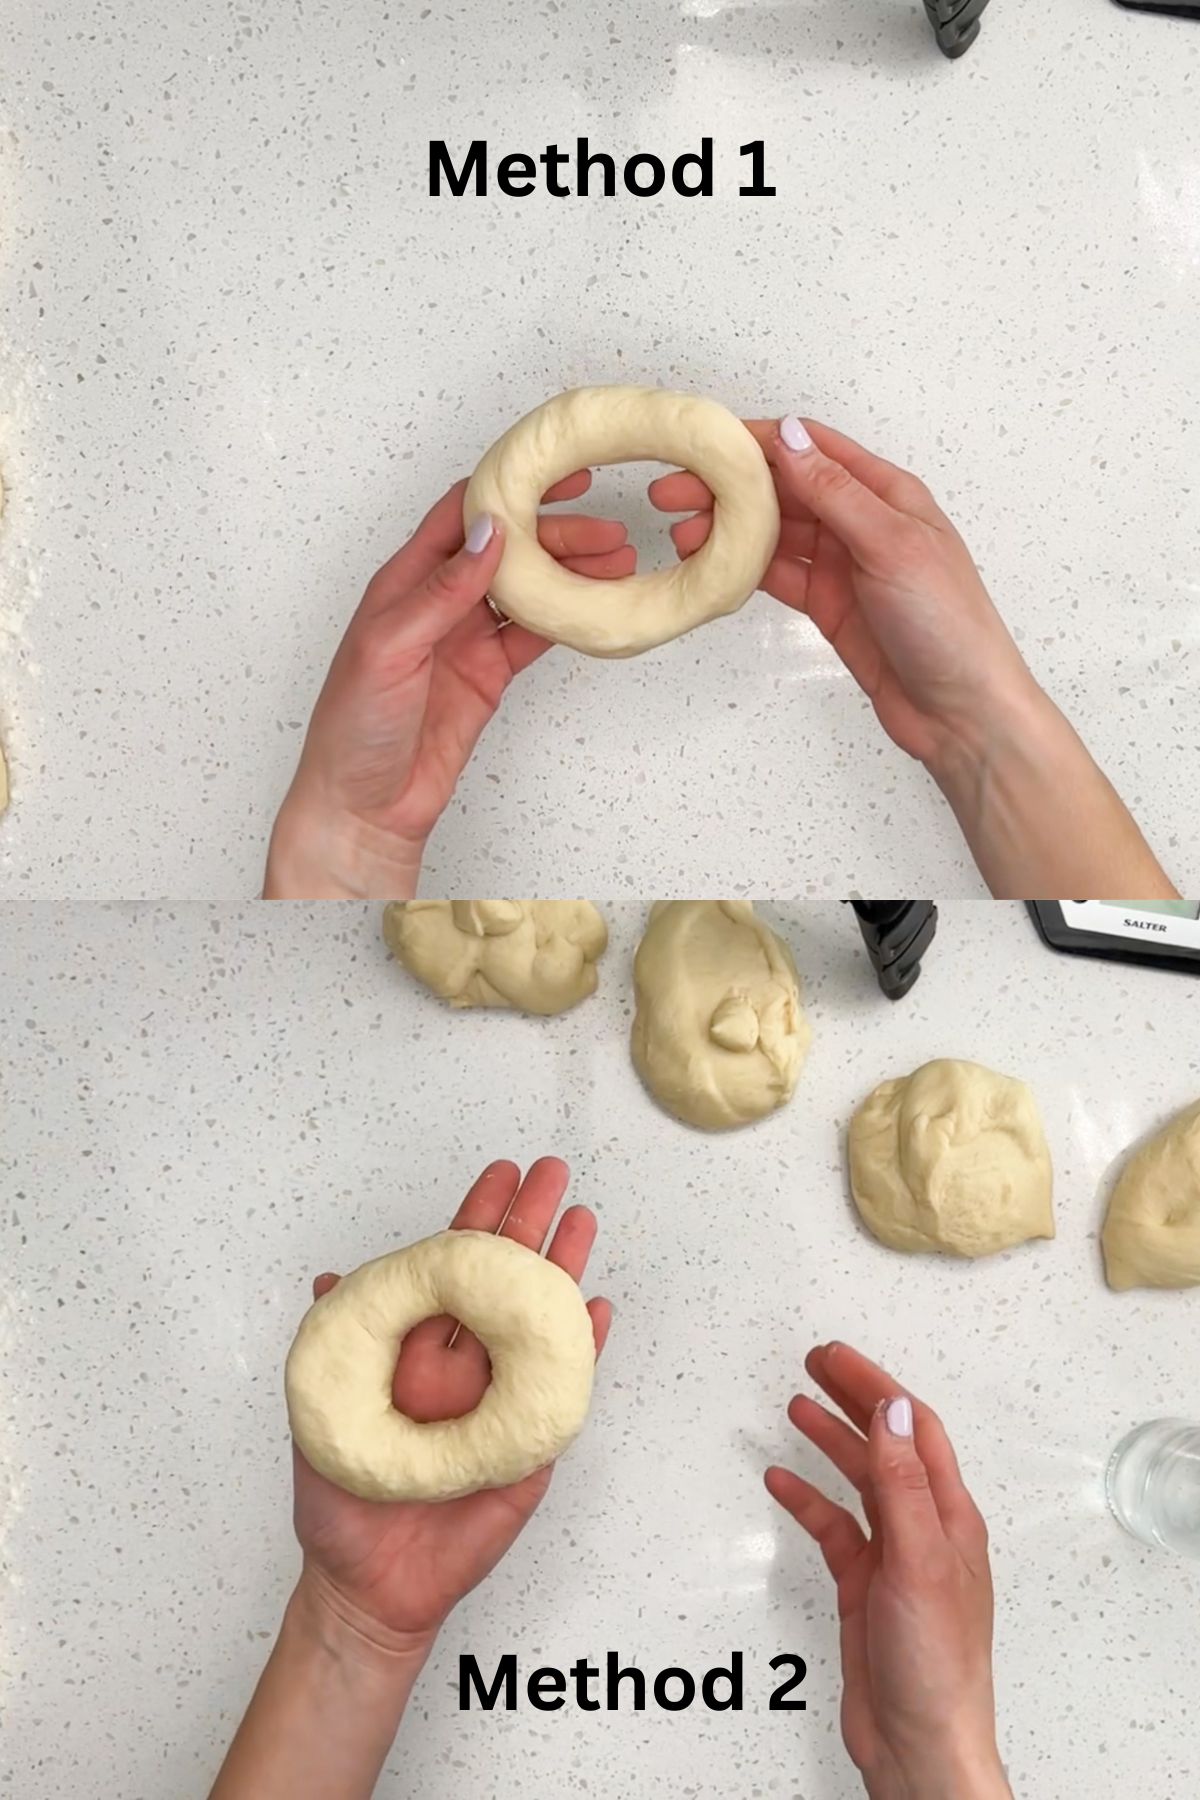
The first method is to roll it out like a snake and use the counter to roll the two ends together. I prefer method one.

The second method is to roll a tight ball and use your fingers to poke a hole in the middle of the dough and then gently stretch it out.
Let the boils rest on the counter while you bring the water to a boil and preheat the oven.

Boil the bagels and add toppings.

Bake the bagels and allow them to cool before slicing them open.

Recipe Tips & Tricks
There are two ways to shape the bagels. The first way is to roll each piece into a tight ball and then use your fingers to make a hole in the middle. Then, carefully stretch out the hole.
The second way is to roll the piece of dough into a snake that can fit around your hand. Then roll the overlapping dough against the counter to roll the ends together. Watch this Easy Homemade Bagels video to see them in action.
Good parchment paper or Silpat Baking Mats are a must. These bagels come out of the boiling water and the dough will stick to a bare pan.
Storage and Reheating
- Storage: Store the bagels in a bread bag. They will stay fluffy for 3 days. After day 3 you may want to toast them or freeze them.
- Reheating: Take the frozen bagels out of the freezer. Allow them to thaw on the counter or in the microwave. Then toast them.
- Freezing: Cut the bagels in half and put the cut sides back together. Double bag them and freeze them.
Additions and Substitutions
- Toppings: It is fun to experiment with the bagels and toppings. Try everything seasoning, dried onion flakes, sesame seeds, poppy seeds, coarse salt.
- Cinnamon Raisin: Add an additional 2 tablespoons of sugar to the dough, 1 teaspoon of cinnamon and ½ cup of raisins.
- Chocolate Chip: Add an additional 2 tablespoons of sugar to the dough. Add mini chocolate chips after the rise and before shaping the bagels.
Frequently Asked Questions
You can keep it simple and add butter or cream cheese to the bagel. You can also add lox (smoked salmon), onion, tomato and capers on top of the cream cheese. Many people like to use bagels for breakfast or lunch sandwiches. You can add scrambled eggs and cheese for breakfast. Deli meat, cheese, lettuce and tomato are perfect toppings for lunch.
Boiling the bagels creates that chewy outer crust, but keep the center of the bagel soft.
Barley malt syrup or sugar can be used in the water when boiling bagels. It helps to create the shiny, chewy exterior of the bagel.
You can make bagels without a mixer, but they need to be kneaded very well to create the classic chewy bagel. The dough is very dense and requires some strength to knead for at least 10 minutes.
More from Thyme at the Table
Follow on Instagram, Facebook and TikTok. Let's cook together on YouTube! See you there! Don't forget to tag me so I can see what you are making!
Rate This Recipe! I love hearing from you!
⭐️⭐️⭐️⭐️⭐️


📖 Recipe

New York Style Sourdough Starter Discard Bagels
Equipment
- 1 Bosch Mixer or
Ingredients
- 2 cups warm water (454 grams)
- ½ cup sourdough discard (120 grams) (a heaping ½ cup)
- 3½ teaspoons Instant Yeast (11 grams) (prefer SAF Yeast, but can sub active dry yeast)
- 2 tablespoons white sugar (30 grams)
- 2½ teaspoons kosher salt (16 grams)
- 6 cups unbleached bread flour (800 grams) wait to add the last ½ cup after you check the dough - see video
For Boiling Bagels
- water
- 2 tablespoons white sugar (30 grams)
Optional Toppings
- everything bagel seasoning
- dried onion flakes
- sesame seeds
- poppy seeds
- coarse salt
Instructions
- Add the water, sourdough discard, yeast, sugar and salt to a mixer. Add 5½ cups of flour to the mixer. Using the dough hook begin to knead the dough. It may take some time to mix well because there is a lot of flour. Slowly add the remaining ½ cup of flour until the dough isn't sticky anymore and it feels very dense.
- Knead for about 10 minutes using a Bosch mixer and about 13 minutes using a Kitchenaid mixer.
- Transfer the dough to a large bowl and cover with plastic wrap. Let rise is a warm place for about 45 minutes to 1 hour or until it has doubled in size.
- Punch down the dough and cut it into 8-12 pieces (It depends on how large you want your bagels. I usually aim for each bagel to be about 160 grams.)
- Dust your counter with flour and place the shaped bagels onto your counter. There are two methods to share the bagels (see video). Option 1: Roll the piece of dough into a "snake." Bring the two ends together under your palm and roll the ends together. Option 2: You can roll the piece of dough into a ball and stick your finger through the center to make a hole and then use your fingers to stretch the hole.
- While your shaped bagels are resting (you do not need to cover them).1. Fill a large pot with water and add the 2 tablespoons of sugar. Bring the pot of water to a gentle boil. 2. Arrange the oven racks to the middle of the oven and preheat the oven to 400° Fahrenheit. 3. Line two pans with parchment paper or Silpat mats.4. Get your toppings ready.
- By the time the water begins to boil the tops of the bagels should be a little smoother and puffier. Gently lift a bagel and place it into the boiling water top side down. I can fit 3 at a time into my pot of boiling water. Boil for 30 seconds on each side. Remove them with a large slotted spoon or spatula. Place them gently on the parchment paper. If you want to add toppings now is the time - while they are still wet from the water.
- Put the first pan in the 400° oven as soon as it is full. Follow with the second pan as soon as you finish boiling the rest of the bagels.
- After 15 minutes swap the pans. Put the pan from the bottom on the top rack and put the pan from the top on the bottom rack. Bake for another 10-15 minutes. Make sure your bagels have started to brown nicely before taking the out of the oven. The dough is dense and if you take them out too early it will still be a little gummy in the middle. Let them cool before slicing.
Video
Notes
Additional Resources
Another short video about shaping the bagels is below.


Sharon Hunt says
I tried making these bagels for my husband and I and they came out great! The video definitely helped with shaping them!
Thyme for the Table says
I'm glad the video was helpful and the bagels turned out good!
Sarah says
How would you add in chocolate chips? After rising, before boiling? Would you still boil with chocolate chips?
Jen Talley says
I add mini chocolate chips after the rise. I gently knead them in and then shape the bagels, boil and bake. I hope that helps!
Kristin says
Oh My Bagel! I am obsessed with this recipe and absolutely love that I can have homemade bagels from start to finish in less than 2 hours! Who knew making delicious bagels was that easy?!
Thyme for the Table says
It really is so much easier than you would think! I'm glad you gave them a try!
Jacqueline Meldrum says
Oh these look so good. Unfortunately my husband managed to end Bob my starter when I was visiting my mum.
Thyme for the Table says
Oh no! Poor Bob! My Doughlene got neglected when I was on vacation in Florida, but a couple feeds later and she perked right back up.
MT says
Should the sourdough discard be recently fed or can it be taken out of the fridge.
Jen Talley says
I've made them both ways!
Hayley Dhanecha says
These look super delicious and absolutely loving this recipe. Homemade bagels in 2 hours? How amazing is that!!
Thyme for the Table says
They really are incredible!
Sheri Lane says
The recipe calls for over 8 cups of flour. It reads to add 5 initially and then add 1 to 3/4 cups for (or something like that). Do you mean we should add that much for or 3/4 from the remaining 3+ cups for that is left over?
Jen Talley says
I just went through and made a huge update on the post. I read through the recipe card and changed the way it was worded. I also added weight measurements to be more precise. There is also a full video tutorial in the recipe card. I hope that helps Sheri. I have been meaning to update this post for a while and I am sorry it wasn't clearly written.
Casey says
You can't really eat store bought bagels after making these!! I love that the dough wasn't sticky and easy to work with! Thanks so much for this recipe!
Thyme for the Table says
You're welcome Casey! I can't even remember the last time I bought pre-packaged bagels!
Rika says
I didn't know that I could turn sourdough discard into bagel! I love the idea!
Thyme for the Table says
Yes! It is a great way to use your ever-growing sourdough starter!
Sammi says
Love these I make them weekly for my family.
Can you make them without yeast and just using active starter?
Alison says
Making your own bagels is so much fun! And you're right, the sourdough starter really makes these extra special!
Timothy says
I’ve tried several recipes for bagels using some sourdough starter, and these are by far the best. My mixer had some struggles with the dense dough but that made the difference: really nice chew on the exterior, and an appropriately soft but not TOO soft interior. Thank you!
Thyme for the Table says
You're welcome! My friend has a KitchenAid and I have a Bosch and the Bosch handles the denser dough a little better, but both get the job done. I'm so glad the bagels were a success.
Kat says
What setting is the mixer supposed to be at? I have a 6qt KitchenAid mixer.
Jen Talley says
The dough is going to be very dense, I would keep it at the slowest setting to knead it.
Laura says
Sooo.. I don’t have a stand mixer. Could I cut this recipe in half and knead by hand?
Jen Talley says
Hi Laura! Yes, you can absolutely knead this by hand. The nice thing about kneading it by hand is that this is not a sticky dough. However, it will be very dense and you will need to put some muscle into it. You really want to knead it well to get that chewiness of New York bagels. You can even just keep the recipe, "as is" and knead it by hand. No need to halve it.
Sarah P says
On my third batch of these. They are fantastic! I mix about 1.5 TBS roughly ground pepper with no toppings...and my husband loves them. Thank you for this wonderfully easy recipe. I have been told I need to make them weekly now.
Jen Talley says
That's awesome Sarah! I have never made them with black pepper! I'm glad you are enjoying them!
Mia Koob says
Could I let these proof over night in the fridge? If so how long should I let them ride out on the counter in the morning?
Jen Talley says
I haven't tried to let them proof in the fridge. But, I have been tempted to try! Let me know if you give it a try. I would be super interested to see how it works out.
Mia Koob says
I tried it! They turned out great, i left the dough covered over night and shapes and baked them in the morning!
Laura says
I am in the process of making my first batch as I’m typing. I was wondering if you or anyone else has tried making these in the air fryer instead of the oven? It’s coming up on summertime and I prefer the air fryer for certain things if I can.
Jen Talley says
Laura,
I have cooked these in my air fryer. I do 325 degrees for about 12 minutes. You still need to put them on parchment paper so they don't stick. At about 8 minutes I flip them and take the parchment paper out. I would cut the recipe in half and just do 4 bagels. Let me know if you have any questions.
Becks says
I am baking them as I type, if adding blueberries or cinnamon raisin and additions (inclusions) when was I supposed to add them as I added after cutting separate pieces when I was making them into ball and shape no good 🤔😞
Jen Talley says
You will want to use dried blueberries because fresh and frozen blueberries are going add a lot of moisture to the dough. You can add dried blueberries or cinnamon and raisins after the first rise. I usually gently knead them into the dough and then portion the dough and shape the bagels. I hope that helps! Let me know if you have any more questions.
Adam says
Any chance to get this recipe in standard SI measurement?
Jen Talley says
Yes, I can work on getting that to you. The good news is that these bagels are very forgiving especially because you are making a dense dough. So even without precise measurements, you will find success. But next time I make these I will write down the measurements, add them to the recipe card and email you.
Adam says
It would be nice! Thank you!
Jen Talley says
I just did a big update Adam. Not only did I add the weight measurements, I also posted process shots in the post. Best of all, there is a new video tutorial in the recipe card. I hope you give these bagels a try. My whole neighborhood loves them!
Annette says
Can I put the dough in the refrigerator after the first rise to boil and bake off the next morning for fresh bagels and coffee?
Jen Talley says
I haven't tried that yet, but maybe I will!! (I just made these bagels yesterday morning and took new pictures and a video I am going to add to this post.) I would definitely reduce the amount of yeast so that it doesn't rise too quickly overnight because then they may deflate when you add them to the water.
If I were to try this I would make the dough in the evening. I would use room-temperature water and reduce the yeast to 1 teaspoon. It will cause the first rise to be slower, but it would reduce the risk of over proofing in the refrigerator. Put parchment paper on two cookie sheets and generously dust them with flour or corn meal. Spray with oil or butter on the top of plastic wrap. Shape the bagels and put them on the cookie sheets and cover them with the plastic wrap. Set it in the coldest part of your fridge. The next morning take the bagels out and allow them to warm on the counter for 30 minutes or so. Boil them and bake them.
Like I said, I haven't tried this method, but this is what I would do. Let me know if you decide to give it a try and I'll let you know if I do.
Kelly says
I tried, it was a flop. I let the dough rise in counter, as always. Then shaped them, cooked half and covered and refrigerated the other raw bagels to make the next day. They deflated and were blobs 🙁 but glad I tried so now everyone knows
Elizabeth Galloway says
These turned out absolutely delicious. Not a difficult recipe and tastes like a bakery bagel. Huge hit with the family. Thank you so much for this quick 2 hr start to finish recipe!
Jen Talley says
Thank's for the great review Elizabeth! I'm so glad your family enjoyed them!
D says
Hi, did you change/update your recipe in March? I found your recipe in January/February and made several batches of bagels - the kitchen aide mix at 13 minutes was spot on and I had dough that climbed the hook and then fell off perfectly, leaving silky dough to rise for an hour. I've tried three separate times to make your recipe in the past week and it's resulted in dry, hard dough. Ive had to throw away 1500+ grams of flour and all my starter discard! Your recipe seems like it's changes online from what I recall based on the photos/videos and text....
Jen Talley says
Hey D! I'm so sorry that the update caused you to have problems! I had someone comment and ask me for the measurements in weight. I was careful to measure the ingredients and weigh them. I thought that I was very careful about the changes. I just realized that for the 2 cups of water, I wrote down the weight measurement for 1 cup. I just updated the correct grams of water and I really appreciate you bringing this to my attention. Email me if you have any questions!
Marcy says
Such an excellent recipe! So easy and the bagels come out perfect every time! Thank you so much for sharing this as many people have been blessed by you and this bagel recipe! ♥️
Jen Talley says
Thanks Marcy! That is really kind of you to write. My neighbors are always looking forward to being gifted my bagels too.
Jordon Reznicek says
So my dough is super thick and hard. What did I do wrong??? I used fresh grained flour rather than bread flour. Does it make that big of a difference??
Jen Talley says
Hi Jordon. Fresh-grained flour usually does require more water. It is also difficult to produce a chewy bagel New York Style bagel because the bran and germ makes it more difficult to produce as much gluten development. I haven't made these bagels using fresh whole wheat flour.
Beth says
These turned out deliciously! I successfully used some old disgard that I keep in my fridge. The only comment I have is that I used the amounts specified by weight and the dough was a little wet. I added more flour but should have added even more. Is your recipe geared more toward the other measurements (i.e. cups, etc?)
Jen Talley says
Hi Beth! I am so glad you enjoyed the bagels! The consistency of your starter can effect how wet the dough is. Check the dough to make sure it is firm and not sticky and if you need to add more flour then definitely add some. The more you make the bagels the more familiar you will be with the dough. I make these so often, that I don't even measure the flour anymore. I just add it until the dough is dense and not super sticky. Please let me know if you have any questions. You can email me too. I'd be happy to help!
Annie says
Do you have a NY style recipe that does not use a discard starter? Sometimes I don't have that amount of starter.
Jen Talley says
I am finishing up a recipe this week! I can't rank on Google search for "NY Bagel Recipe" so I am calling it "Plant Based Bagels." But it was my go-to recipe for YEARS before acquiring a starter. They are chewy on the outside and fluffy inside and they are seriously so good! I'll email you when it is finished this week!
Jen Talley says
Hi Annie! I just posted my recipe for the NY Bagels without starter. The recipe is "Plant Based Bagels."
ROBYN says
First try and they were absolutely fabulous. Wonderful instructions thank you. My one question is: it would be good to get to a certain stage at night, leave and then cook in morning so nice fresh hot bagels for breakfast. Is it possible to do this? Many thanks
Jen Talley says
Hi Robyn! If I were to try this I would make the dough in the evening. I would use room-temperature water and reduce the yeast to 1 teaspoon. It will cause the first rise to be slower, but it would reduce the risk of over proofing in the refrigerator. Put parchment paper on two cookie sheets and generously dust them with flour or corn meal. Spray with oil or butter on the top of plastic wrap. Shape the bagels and put them on the cookie sheets and cover them with the plastic wrap. Set it in the coldest part of your fridge. The next morning take the bagels out and allow them to warm on the counter for 30 minutes or so. Boil them and bake them.
Like I said, I haven't tried this method, but this is what I would do. Let me know if you decide to give it a try and I'll let you know if I do.
Teresa says
After the shaped bagels rise and I try to move them on the parchment closer to the pot, they deflate completely. That also happens if I just pick them up. What do I need to do differently?
Jen Talley says
Teresa, how long are you letting them rise. It should be about 10 minutes (I do it just long enough to get the oven preheated and the water boiling). They just barely get puffy. Also, how dense was the dough? I'd love to help you perfect your bagels! Feel free to email me.
Dee Elliott says
Hi! I love your site! We have Cuisinart food processor- do any of the attachments that come with it work for the kneeling? Or, do we have to get a special attachment? What would work best?
Thanks,
Dee
Jen Talley says
Hi Dee! Thanks! Some food processors have a completely plastic blade that can be used for dough. I do have a food processor, but I haven't used it to make dough. The bagel dough is a pretty dense dough so I am not sure how the food processor would handle it. Let me know if you try it. You can also knead this dough by hand. It will be a bit of a workout, but because it is a dense dough it isn't sticky so it is easy to work with. Good luck! Let me know if you have any questions!
Denise says
Absolutely delicious! My customers love them! Have you tried freezing dough after shaping and take them out and boil and bake as needed? Thank you!
Jennifer Egan says
I'd love to try this recipe after reading the reviews - however, I only have a hand mixer (with dough hooks) that doesn't do well with heavy doughs, or a food processor with a dough blade. I'm not sure I could knead by hand as long (and hard) as you are suggesting with my bad shoulder, haha. Any thoughts on using the food processor with dough blade to get it going and then maybe a shorter knead time? Thanks in advance!
Jen Talley says
Hi Jennifer! The bagel dough is a pretty dense dough so I am not sure how the food processor would handle it. You may want to try very slowly adding the flour to the food processor. Stop adding it once the food processor seems to hit its limit. Then add the remaining flour by hand when you finish kneading it by hand. I hope you are able to try the recipe. If you do, let me know how it goes!
Sarah says
These are so great! I just have a question out of curiosity - how did you come up with the measurement for yeast? It feels like a lot, more than a standard packet.. does it aid in the chewiness? Just curious 🙂 Love this recipe, thank you!!
Jen Talley says
Hi Sarah! Normally a packet of yeast (2 1/4 tsp) is for 4 cups of flour. I increased it to 3 1/2 teaspoons because the recipe is using about 6 cups of flour. You could reduce the yeast a little (3 teaspoons OR 1 tablespoon) and be just fine. It shouldn't affect the chewiness. It will affect the rise time. You would want to keep an eye on the first rise and even the second "rest" after the bagels are shaped. You want them to begin to get a little puffy before they go into the boiling water. I'm glad you are enjoying the recipe.
Mary Connolly says
I’ve made these 3 times now and each time the bagels have been perfect. So tasty and chewy. Perfect!
Jen Talley says
Thanks for the great review Mary! I really appreciate you taking the time to rate the recipe!
Corrie says
These are the BEST bagels I’ve ever had! I love that they use sourdough discard. Our favorite flavors we’ve made are cheddar cheese and brown sugar cinnamon. My husband requests I make these multiple times a week (we do a half batch). Thank you for this incredible yet easy recipe! I recommend it to all my friends.
Jen Talley says
Thanks Corrie! I've never made them with cheddar cheese or brown sugar and cinnamon. I'd love to try the brown sugar and cinnamon. Do you just sprinkle some on top after boiling them?
Stephanie says
My dough was a little sticky. I think maybe I didn't add quite enough flour at the second addition or I didn't knead my dough long enough (I did 13 min on low with KitchenAid).
In spite of them being oddly shaped and looking kind of wrinkly when boiled, they baked up perfectly and are amazing! They're 100x better than I expected them to turn out.
I can't wait to make them again with the knowledge I gained from my first attempt. Hooked!
Thanks for this easy to follow no-fail recipe. 🙂
Jen Talley says
Hi Stephanie! I'm so glad they turned out fantastic even with the dough being a little sticky. I always give my dough a poke after it has been kneading for a few minutes and see how it feels. If it is sticky it definitely needs more flour. It should be pretty dense and not stick to your finger. Let me know how the next batch turns out!
Melissa says
Can you freeze these before you boil them? Thaw them out and boil and bake when I want another.
Jen Talley says
Hey Melissa! I haven't tried that before, but I think it might work. As soon as you have them rolled out into the bagel shape I would immediately freeze them. After they thaw, boil and bake as usual. Let me know if that works for you. I might try it too!
Melanie says
I made your bagels and they are quick, easy, and tasty. Just a question and a comment. Do you start the first 15 minute time (for switching the pans) once both pans of bagels are in the oven or right after the first pan goes in? I couldn’t tell for sure from how the instructions were written.
Also, I made the recipe after reading through all your written instructions but did not watch your video first. I was disappointed to find the important suggestion to use fed starter is only in the video. It would have been helpful for that to have also been in the written instructions.
Jen Talley says
Thanks for the feedback Melanie! I think both of those are important instructions I should include. To be honest, I keep an eye on the top pan and when I see that it is starting to lightly brown, I make the switch. In my oven, it is usually about 15 from the time I put the first pan in. I have made the bagels with fed starter and not. They turn out great both ways, but perhaps even slightly better with fed starter. I'll try to go in and edit the post when I have a minute. Thanks again for taking the time to leave a review!
John says
These bagels are a hit, everyone that has tried one love them. This is now my go to bagel recipe.
Jen Talley says
Thank you so much, John! I love that you are sharing them with others! Enjoy!!
Mark says
I used the recipe as a base. Made onion bagels, added a large whole sweet onion pureed in food processor. Weighed onion and equated approximately 80% in grams to water Weight. They came out excellent.
Jen Talley says
Wow Mark! I've never thought to do that! So cool!
Donatella Bennett says
These are wonderful 👍I have made them many times I actually make mini bagels from the recipes now . They are delicious 🤤
Jen Talley says
Thanks Donatella! I love mini bagels too! Sometimes I make pizza bagels for lunch or dinner.
Vilma Morales de Salazar says
I just loved this recipe. They came out perfectly.
Highly recommended.
Jen Talley says
Thanks Vilma!
Dee Elliott says
I’m on my second time maki g these bagels and wanted to thank you for the clear, thorough directions. After making sourdough for about 2 years, this recipe for bagels is so much easier! On my first try they were delicious but didn’t rise as much as maybe they should have. I did let them rise to double on the first rise. Did I not let them rise enough after the shaping? Can you give me a time (in minutes) for how long you let them rise then? Thank you so much!
Jen Talley says
Hi Dee! I don't know the exact time because it depends on the temperature of my kitchen. I shape all my bagels and then I start the water to boil. If my kitchen is warm they are usually ready by the time my water starts boiling. If my kitchen is cold they may not be ready. You are looking for the shaped bagels to look puffy, but NOT doubled. They should continue to grow while they boil and bake. I hope this helps. If you want to email me a picture of the shaped bagels and another picture of when you are about to boil them I can take a look for you.
Vilma says
They came out nice. To make them absolutely sourdough, why usen of yeast should the process be longer or same?
Jen Talley says
If you don't use yeast the process would take longer. I haven't created a recipe for that yet. Good luck!!
Linda says
Oh my gosh! I am never buying bagels again! I made half Everything Bagels and Cheddar Jalapeños Bagels. They had a great chewy texture that's fluffy at the same time. Super easy and fail proof. I like the idea of giving them out as a gift. I think I'll be making these a lot!
Jen Talley says
Thanks Linda! I love the idea of cheddar jalapeno! I will have to try that! I give them out for Christmas to my neighbors with a little thing of cream cheese. It is always a hit!
Veronica says
I don’t have a mixer can it be worked by hand?
Jen Talley says
Hi Veronica! Yes, you can definitely knead it by hand. It should be easy to work with because it isn't a sticky dough. However, it is dense, so you will really need to put some strength into kneading it and develop the gluten for a chewy bagel. I hope you enjoy them!
Lia says
Hi, these are SO good, thank you. Even as a complete amateur with no equipment who tried kneading by hand lol they still came out great! QUESTION:my sesame seed toppings didn't stick even though I put them on wet as soon as it came out of the boiling water. They looked great and came out of the oven looking perfect but when I turned them on their side to slice them ALL the sesame seeds fell right off lol how can I fix this? THANK YOU ! 🙂 <3
Jen Talley says
I'm so glad they turned out great!! My toppings always stick super well when I add them as soon as the bagels come out of the boiling water. But, if you are having trouble with that, you can make an egg wash with 1 egg white and 1 tablespoon of water. Once, all the bagels are out of the water gently brush one at a time with the egg wash and add the sesame seeds right away. Continue with the rest of the bagels. I hope that helps! Thank you for your kind review!!
Diane Laes says
There is fresh cake yeast at my store. How would I use that with this bagel recipe? Thank you.
Jen Talley says
Hi Diane! I haven't used fresh yeast before, but I looked up some information on the king arthur website. It sounds like you would need to use twice as much (by weight) of fresh cake yeast to replace instant dry yeast. Break it up and add it to the water. I hope that helps.
Sarah Torre says
These turned out wonderful on my first try. I do need to work on the shape a little. Thank you so much for the recipe!
Jen Talley says
Hi Sarah! The shaping takes the longest to figure out, but before you know it you will be making perfect bagels! It definitely helps to squeeze all the air out of the dough before shaping them. Let me know if you need any help! I'm so glad you enjoyed the bagels!
Allysen says
For years I made greek yogurt bagles... until now! Made these today & they are going in my recipe book! Thanks!
Jen Talley says
Thanks Allysen! I love that they became a part of your recipe book!
Diane says
Are you kidding me right now?!? This recipe is amazing! Hands down the best bagel I have ever had!!! Note… I had to add an additional cup of flour because my dough was wet and sticky and wouldn’t get to knead consistency in my Kitchen Aide Mixer. I didn’t mind! Other than that I would not change a thing. I suggest using the “roll like a snake” technique. Way easy!! WOW! My mind is blown!! I will make these again, and again, and again. And again. Can’t wait to show them off to my coworkers!!! Thank you for this PERFECT bagel recipe!! Your videos are a great guide!!!!
Jen Talley says
Thanks Diane!!! This review made me smile and made my day! Thank you for your kind words!
Stephanie says
Wonderful! I used mostly whole wheat flour (I ran out of white with all the Christmas baking), and put some garlic, onion flakes, tomato powder, oregano, and parsley directly into the dough. This recipe is definitely a keeper!
When I get to the store for some white flour, I will definitely be making a few plain batches to have on hand for Christmas guests!
Courtney says
Are these GF at all? Or how could they be more GF?
Jen Talley says
Hi Courtney! These are not gluten-free. They contain flour made from wheat. I'm not sure how to make gluten-free bagels. I wish I could help. Good luck!
Mary says
I did it! They came out amazing! Thank you for the wonderful directions!
Jen Talley says
Thanks Mary! I'm so glad they turned out amazing for you! They make great gifts for neighbors with the holidays coming up!
Anna says
Wondering if anyone has tried without yeast and just using the sourdough starter?
Thanks and look forward to trying to recipe
SUE says
Can I substitute the flour cup for cup for gluten free flour?
Jen Talley says
Hi Sue, I have never worked with gluten-free flour, so I am not sure. Sorry I can't help. Please let me know if you try to make them with gluten free flour and how they turn out.
Natalie says
I’ve made these bagels twice and both times they turned out great! My only complaint being that both times I have followed the recipe to the t and my bagels come out with burnt (REALLY burnt) bottoms. Any suggestions?
Jen Talley says
Hi Natalie, I'm so glad you are enjoying the bagels. I've never had that problem, but a couple of things to try:
1.If you are using two pans, make sure you are rotating them halfway through- placing the top pan on the bottom rack and bottom pan on the top rack.
2.If you have an additional rack, you could put below the other two racks and put an extra baking sheet on the bottom rack. However, the excess heat may not be great for the dry baking sheet so you may want to use an old baking sheet.
3. Bake 1 pan at a time in the middle of the oven. Shape the first 4 bagels, let them rest, boil, bake. After about 5 minutes, roll out the second bagels, let them rest, and boil them right as you take the first pan out of the oven.
4. Get an oven thermometer to check what temperature the oven is truly baking at. You may need to turn down the temperature just slightly.
5. If you are using a pan with dark nonstick coating, it may burn the bagels. Aluminum half-sheet pans are pretty inexpensive and may help. I have one linked in the recipe card.
I hope that helps, let me know if you have any more questions!
Suzanne says
I am a native New Yorker who grew up on Long Island and my neighbor and good friend owned an appetizing store in Manhattan add well as as a bagel store and made his own bagels, so I am very spoiled because every weekend he brought home fresh bagels, lox, cream cheese from the big container, white fish, pickled lox and some other goodies. Moving to Florida 18 years ago I found a kosher place close by that buys most of their appetizing from the same place my neighbor did which was one of the best smoke houses in New York, so once in a while I treat myself, but the bagels, made with New York water cannot be duplicated here, so of course I am going to make my own. My sourdough starter is ready to go and I have enough discard to keep me busy for a while. I only use bottled purified water as that is what I give my dogs and water my indoor orchids with, and I use many of the same toppers you do for various things, so I am ready to go. Thank you for sharing your incredible recipe.
Suzanne says
You state using two different stand mixers, but I was just given a gift of a New Hamilton Beach Stand Mixer that has several attachments including a dough hook. Now you state that the Bosch should take one time and the Kitchen Aide another time so what happens to those of us that have different makes. Another question I have is where do I purchase a bread bag, as I have never seen one advertised where I live in south Florida. I am sure Amazon carries them, but I do not belong to them and refuse to pay their prices. I do sew so i guess i could always make one after I see what it is made out of as I certainly have all kinds of fabric. I love your recipes, and i saw that you have a death by chocolate Zucchini recipe and I have made a similar one, and you really could gain enough weight to kill yourself if you et enough/ I love your simple recipes.
Jen Talley says
Hi Suzanne! My dad grew up in Queens! My parents retired in Florida. Your description of the goodies from the bagel shop in NYC had my mouth watering! For the Hamilton Beach mixer, I would use the dough hook with the slowest speed and follow the same time as the KitchenAid. Thanks for your kind comments. They made me smile! I hope you enjoy the recipe! I'm happy to help with any questions!
M.S. says
For a bread bag, you could just use a paper bag.
Ralph Berman says
Made these bagels for the first time last night. My son had one today and actually called me at work to tell me how good they are. My wife, who complains that I mess up the kitchen when I bake, has suggested that I make more for the weekend. That said, 800 grams of flour seems like a lot more than 6 cups. I bake by weight so used the full 800. It was still sticky so added more flour and then added more while shaping. Still remained mildly sticky, but the bagels came out great.
Jen Talley says
Hi Ralph! I am so glad your family enjoyed the bagels! The amount of flour you will need will depend on your starter or discard. If you have a thinner/more watery starter/discard, you may need more flour. I tend to make a thick starter, and so 800 grams works for me. Definitely go by the feel of the dough, it shouldn't be very sticky, so I am glad you added more flour! You definitely know your way around bread to naturally adjust accordingly. Let me know if I can help in any way! Enjoy the bagels!
Jen says
First time trying these and they turned out fantastic and will definitely be repeating! One question I do have is how can I make sure that the bottom is softer?
Jen Talley says
Hi Jen, I'm so happy you loved the bagels! I don't have a problem with the bottom being hard, or crispy when I make them. If you have 3 oven racks, you could put an empty cookie sheet on the bottom rack to deflect some of the heat. You could try moving the racks up one shelf higher and see if that helps. Also, make sure you are rotating the racks halfway through. If you are still having problems, you could try turning your oven down to 375 F. I hope that helps!
Ali says
I don’t like using commercial yeast. Is there a way to make these with active sourdough starter?
Jen Talley says
I haven't made them with just active starter, but it is on my list of things to do!
Kelly says
These were absolutely delicious. Probably the best bagel I’ve ever had!
Jen Talley says
Thanks Kelly!!
JC says
Best bagels I’ve ever had said my entire family.
Jen Talley says
That's awesome JC! I'm so glad your entire family is enjoying them! Just wait until your neighbors try them... you will need to open a little bagel shop. haha! Enjoy!
Christine Vande Vrede says
I’ve been baking with sourdough and discard for about a year now and I’m really getting the hang of it! These bagels get a 10 out of 10 from the whole family! I only boiled for 30 seconds each side, reduced the heat by 25 degrees half way through baking and used a mat to avoid a dark crust. We like them soft and chewy!
Jen Talley says
Thanks Christine! Thanks for sharing your tips! Enjoy!!
Billie says
So amazing! I added Asiago before shaping and topped with garlic butter and shredded Asiago before going in the oven. Such great texture and flavor. Will Def be making this again
Jen Talley says
Thanks Billie! I've never done garlic butter. That sounds so good with the Asiago!
Jennifer says
Stuck inside during an ice storm and made these. Used discard starter and yeast. So perfect! Dense and chewy. I love that they were done start to first bite in 2 hours!
Jen Talley says
That sounds like a great use of time during an ice storm! I'm so glad you liked them! Ps. love your name 😉
Kristen says
These bagels are great! I've struggled with your typical bagel recipes (non-sourdough) and having them deflate after cooking, but these stayed plump. Not only do they look amazing, but they taste amazing too. They were so simple and quick. Thank you for your great recipe and instructions!
Jen Talley says
Thanks for the positive feedback, Kristen! I love that they were a success for you! Enjoy!!
Jami says
Any suggestions? The outside of my bagels were very hard and crunchy. The dough was very dense as well, I had a feeling something was going to turn out wrong. I did the recipe by cups but I think I will try by measurements next time. Also I only used just over 5 cups of King Arthur bread flour.
Jen Talley says
Hi Jami! The bagels should be chewy, but not hard and crunchy. Definitely watch the dough as you are adding the flour. You do want the dough to be more dense than regular bread dough, but not too dense that you can't shape the bagels after the first rise. You could also try turning your oven down by 25 degrees and see if that helps as well. Feel free to email me pictures or question and I'd be happy to help.
Stefanie Whitely says
Hello, I absolutely LOVE this bagel recipe but am wondering about inclusions. We love fruit in our bagels so maybe can you give me an idea of raspberry and blueberry inclusions on this? How much and when to fold into the dough?
Jen Talley says
Hi Stephanie! Thanks for the positive review! I prefer to add dried blueberries vs. fresh/frozen blueberries. The moisture in the fresh and frozen blueberries can cause the inside of the bagels to be a bit wet/gummy right around where the blueberries are. I add the dried blueberries into the dough when I am about to shape them into the bagel shape. I haven't tried raspberries yet. I haven't seen dried raspberries in my local grocery store, but you could try freeze-dried raspberries. Let me know how they turn out!
Vincenza says
These bagels are amazing! They were my first sourdough discard recipe and they were a huge hit with my family! The recipe is so easy and not fussy. I will never buy bagels again!
Jen Talley says
Thank you, Vincenza! I love that your family enjoyed them! I can't remember the last time my family bought bagels. These are just so good!
Megan Lonsdale says
Mine are in the oven now. They are HUGE and puffy! Did I do something wrong? Each one was about 160 g.
Jen Talley says
Hi Megan! 160 grams is about right. You can make 9 bagels and drop them down to about 140 grams and they will be a little smaller. Also, make sure you made the hole in the middle big enough. It helps them to not get so puffed up in the middle. How did they bake? Are they good?
Loraine says
Hi there! Planning to make these soon! Is it okay to use sourdough discard from the fridge or should you let it come to room temp first? Thanks!
Jen Talley says
Hi Loraine! You can use it from the fridge, the first rise may take a little longer because it will make the dough a little cooler, but it will work out just fine.
Jenn says
About to try this recipe with regular toppings, but has anyone tried to make sundried tomato bagels? Just wondering when and how much to add. Thanks!
Jen Talley says
Jenn! That sounds wonderful! I have some sun-dried tomatoes in my fridge. I think they would work with the recipe. In general, juicy fruits like fresh blueberries, can cause pockets of gummy, wet spots in the bagels, but dried fruits work great. I think sundried tomatoes would work wonderfully, you may want to cut them into small pieces.
Alexis says
Is Ap instead of bread flour going to be ok?
Jen Talley says
Hi Alexis, yes you can use all-purpose flour. The bagels may not be as chewy, but they will still be delicious.
Brittani Ballings says
If you want toppings through the bagel (blueberries, raisins, etc.) would you be able to incorporate throughout the dough? And if so at what point in the process?
Jen Talley says
Dried fruits do better like raisins, dried blueberries etc. Fresh blueberries can cause pockets of gummy dough. I usually add them to the dough after the first rise and right before I begin shaping the bagels.
Courtney says
These bagels were delicious! So fluffy and chewy. Have you ever tried making them with freshly fed starter and no yeast? Wondering if that would work and if I would need to make many changes to the technique besides stretching out the time schedule. Thanks!
Jen Talley says
Hi Courtney! That is on my to-do list! I need to give them a try without yeast and see how to adjust the recipe. I'm glad you enjoyed the bagels!!
Sarah Le Roux says
Probably the best bagels I've ever had! Great recipe! Thank you!
Jen Talley says
Thanks for the amazing compliment, Sarah!!
S. Garcia says
This is my go to recipe when making bagels!
Jen Talley says
Love it!!
Heidi says
Incredible! My family thinks I make better bagels than Einstein’s. I will definitely make these again.
Jen Talley says
I can assure you that your bagels ARE better than Einstein's! haha! I'm glad they are enjoying them!!
Linda says
I’m questioning the amount of water listed in grams. I always bake using gram measurements and 2 cups is not equal to 454 grams. Please check this and correct it.
Jen Talley says
Hi Linda! 2 cups of water is 454 grams. The ingredient weight chart on the King Arthur website confirms this as well. I also just ran to my kitchen and got my kitchen scale out to double check and I got 454 grams. I understand not wanting to waste ingredients on a recipe. I will say that, the flour weight on this recipe does not align with the King Arthur ingredient weight chart. Every time I weigh my flour it weighs more than what they say it should, even when I fluff it, scoop it gently with a spoon, and level the top. So I went with my weight for flour, because I have made this recipe hundreds of times. Honestly, the biggest advice I can give is to watch the video and look at the consistency of the dough. I've made this so many times, that sometimes I don't even measure my flour anymore, I just add enough until it is the right consistency. The dough should feel dense and not stick to your finger when you poke it. Let me know if I can help!
Jaslyn says
Wow, so these were AMAZING! Just the right amount of tanginess with the tangy starter I’ve had waiting in the refrigerator.
I swapped the water for liquid whey from attempting to make homemade cream cheese - total bust.
The yeast came out to around 13g at 3.5tsp so just went with it. I let proof overnight for about 10ish hours. Made 8 with each around 163g with a 9th as a mini bagel.
Shaped, boiled and baked at 400° on a single sheet without swapping anything around for about 24 minutes.
Absolutely perfect. Best bagel I’ve ever tasted and I live in westside LA where you can get incredible bagels…
Jen Talley says
Thanks for the review Jaslyn! I've never let the dough proof overnight. Did you do it in the fridge? I'm so glad you had success with the recipe!
Lauren says
These were soooo good! I made them one morning when we had company over and everyone loved them! My daughter immediately asked me to make them again. Huge hit! And we're from Brooklyn, NY. Just moved to Jersey 2 years ago. We still get good bagels here, but these were far superior!
Jen Talley says
Thanks for the amazing compliment Lauren!! My dad grew up in Queens and he approves too! I lived in New Jersey until middle school. I really appreciate your kind review!!!
Jacey says
Super easy! Only thing that threw me off was the cook time. I can only boil one bagel at a time in my size of pan so I’m not sure how long the first pan was in the oven for. What’s the overall cook time for one pan of bagels?
Sally says
We have made this bagel recipe twice now. Fabulous and have been perfect each time. We, too, found the best way to make the bagel hole is to roll dough in a ball and poke finger through. I never thought I would be able to make bagels from scratch - thank you for this easy to follow recipe!
Jen Talley says
You're welcome, Sally! I'm so happy you are enjoying the bagels!!
Denise says
My go-to bagel recipe! I’ve made these every week for several weeks and they always turn out perfect! Thank you!!
Jen Talley says
You're welcome, Denise! I'm so glad you love them!
Pam Combs says
This is my favorite sourdough discard recipe. I have made it three times and they turned out the same each time absolutely beautiful and so delicious. I have shared them with family and friends and they ask for more. Thank you for sharing the recipe.
Jen Talley says
Thank you so much, Pam! And thanks for sharing the recipe!! Enjoy the bagels!
Courtney says
What are the nutritional facts?
Jen Talley says
Sorry Courtney, I don't have experience calculating the nutritional facts and I wouldn't want to accidentally mislead someone.
Juli says
My son asked for bakers for breakfast this week…. Gave these a whirl today.
Super easy and oh so delicious! I tried half with a slice of Brie. So good!
Jen Talley says
Thanks Juli! They sound delicious with brie. I hope your son enjoyed them too!
Andrea says
I made these today and they turned out AMAZING. I wish I could post a picture.
Jen Talley says
Thanks for the awesome review, Andrea. You can share the picture on FB or IG and tag me if you would like! I'm glad you enjoyed them!
Marie says
First time making bagels and had some sourdough discard to use up. This recipe was perfect and easy to follow. I love the fact that start to finish, in one day you have bagels! Mine looked like a bagel and a roll had a baby but they tasted like delicious bagels. I’ll be making again and again so I can perfect the shape. Thank you!
Jen Talley says
I'm so happy you enjoyed them! Let me know if you have any questions. I am happy to help!!
Sara says
I’ve made these twice now and they are so good. Except they are super chewy the next day, in fact almost after they’re completely cooled. I can’t eat them without toasting. What could I be doing that’s causing me to miss out on that fluffy interior?
Jen Talley says
Hi Sara! They are supposed to be pretty chewy on the outside with a dense, but soft interior. You could reduce the amount of kneading time and that will help. Make sure you store them in an air-tight container or bag after they are fully cooled so that they stay soft in the middle. If the dough is very dense and not sticky, you could also reduce the flour just a little to help make sure the bagel will be a little less dense. Finally, when the bagels are resting on the counter while the water is boiling you could give them a little mist of water on top of them and let them sit for a little longer before boiling them. I hope those adjustments help you fine-tune your perfect bagel!
Marie-Claude says
Love the recipe, quick and delicious! The only problem Im having is that after 30 minutes, my bagels still arent browning, or just barely. Im scared if I cook them longer they will be over cooked! Any idea to make them a bit more brown for esthetic purposes?
Jen Talley says
Hi Marie-Claude! At 400 degrees Fahrenheit, the top pan should be browning and then you can rotate pans so they cook evenly. You may want to get an oven thermometer to see what temperature your oven is at. Does it seem like there is a lot of steam in the oven from the bagels? If so, try to reduce the amount of water that gets transferred to the pan after boiling the bagels by using a large slotted spoon or spatula. You can also let some of the steam escape by cracking open your oven door a few times to let some of the steam out. Also, unbleached bread flour vs. regular bread flour will help a little. One more thing, you can brush the tops of the bagels with an egg wash to help them brown as well. Although, I've never had to do that when I make them. Please let me know if that helps. Thanks!
Megan Cupido says
Just tried these today. They turned out amazing. Thank you
Jen Talley says
Thanks Megan!
carly says
Hi i only have 5 grams of yeast on me, how can i make this still work?
Jen Talley says
It is going to rise slower with 5 grams of yeast. Make sure the yeast isn't expired too. Give it more time for the first rise and you may need to let it rest a bit longer before boiling.
Susan Hedgpeth says
easy recipe, I make Blueberry with dried berries and blueberry ext. and I have made these over and over. These are very easy to make.
Jen Talley says
Hi Susan! Thanks for leaving a review! I'm so glad that you love the recipe. I love blueberry bagels! I've used dried blueberries before, but I haven't tried blueberry extract! That sounds amazing!!
Jen L says
First thing I made with the discard and as my kids say - these bagels slap! LOLOL Super easy to make and oh my goodness they are good! The kids wanted to know if I took orders, so since I have lots of discard to get rid of this week and I will be making some for all my kids homes!
Jen Talley says
Hi Jen! Thanks for the review. It made me laugh! I love that you are sharing them with the whole family. Just beware, if you share them with neighbors, you might have to start up a bagel business! lol
Emily says
Hi! I’m currently making these as we speak and my dough is doubling in size but doesn’t have bubbles like yours. Do they need to sit out longer?
Jen Talley says
If the dough doubles in size you are good to go!
Marianne says
I've made this recipe 3 times now. My family loves the bagels. Generally I weigh everything except the yeast which I usually just measure. I noticed when making them today that the yeast weight vs. measure seemed off. Then I looked up what does 3 - 1/2 teaspoons of dry yeast weigh and it was more than 9 grams which measures out at 2 teaspoons. Do you recommend weighing the yeast for this recipe or using the teaspoon measure for the yeast.
Jen Talley says
Hi Marianne! I am so glad that the recipe is working out for you and that your family loves the bagels! I originally used the King Arthur weight chart for the yeast weight because I usually just measure it with measuring spoons instead of weighing it. I just updated the recipe to be 11 grams for the yeast. King Arthur says 1 tablespoon (3 teaspoons) is 9 grams and I usually use 3 1/2 teaspoons. Although, I have also just done 3 teaspoons (1 tablespoon) and it works out fine too. I just got my kitchen scale out and for the SAF Instant Yeast I use it did weigh 11 grams for 3 and 1/2 teaspoons. What brand and type of yeast are you using? It wonder if it may vary based on brand.
Melissa says
I recently tried this sourdough bagel recipe, and I have to say, these are by far the best bagels I've ever had! The recipe was super easy to follow, and the results were fantastic. The bagels turned out perfectly chewy on the inside with a nice crust on the outside. I highly recommend this recipe to anyone looking to make delicious homemade bagels!
Jen Talley says
Thanks Melissa! I'm so happy that the bagels turned out fantastic!
Betsy says
Thanks for a great recipe! Couldn't be easier and so delicious! Can't wait to make them again!
Jen Talley says
Thanks Betsy! I'm thrilled that you like the bagels!
Suzanne Leib says
Made these for my husband and he fell in love. Said they are by far the best bagels he has ever had. The crust is nice and chewy and inside is moist and fluffy. Wonderful recipe, thank you so much for sharing. Will be making many variations of these. Can't wait.
Jen Talley says
Thanks for the review, Suzanne! Let me know what variations you end up making!
Sylvana Pappas says
Hi Jen,
Is there a way to make these with active starter? For health purposes we are staying away from commercial yeast. Thanks!
Jen Talley says
Hi Sylvana! I haven't tried to make them without yeast. It is on my list of recipes to create though. Good luck!
Alissa says
If you were to want a pumpkin style bagel, how would you add that in? Would you substitute anything or just add it in. Also would you do pumpkin pie or just pumpkin and add spices?
Jen Talley says
I have a pumpkin spice bagel recipe on the site! It isn't a discard recipe though. I used some pumpkin puree and the spices. However, you could totally use this discard bagel recipe and just add the pumpkin pie spices and change the sugar to 1/4 cup of brown sugar. If you really want to include the pumpkin puree then replace some of the water with the puree. If you need to add a little less or more flour to make the dough feel dense and not sticky, then make the adjustments as you go.
Elksa H says
Your bagels sound and look amazing, however, I wonder, it possible to make this recipe without the instant yeast please?
Jen Talley says
Hi Elksa! I haven't make them without yeast yet. But it is on my list of new recipes to create.
Kristin Cipes says
I didn’t have enough yeast in my cupboard and they worked great. I just let them bulk ferment and rise longer. They were still done the same day!! I’m definitely going to try with no yeast at some point too.
Janice says
Good evening, great recipe seem to have come out well. I feel as though they deflated some when they were cooked. They are slightly wrinkled looking and seemed to have flattened out a bit. How do I get them to stay big, thick and smooth? Thanks so much.
Sarah R says
Love this easy recipe and am making another batch today! Bagels didn’t last long enough to freeze in our house! Thanks for sharing this awesome recipe!! My only complaint is now I will never want to eat store-bought bagels again! 😂
Mercedes Wieger says
My whole family loved them!
Diane Ward says
Is there a way to make these without yeast and use only Sourdough Starter? If yes, how much starter would you use?
Sarah Robles says
I made these and they were delicious and didn’t last long enough to have to freeze! Thanks for sharing this detailed, easy to follow recipe! I’m making more today. I’m going to try to make some blueberry bagels- I’ve got frozen blueberries. so hopefully I can make it work. My one complaint is that I will never enjoy store-bought bagels as much anymore 🤣
Sarah Robles says
Recommending because I meant to give 5 stars!!
Jane Lair says
These are better than the Costco ones I’ve been buying. Sprinkled with fresh Parmigiana cheese and also made a few with the Everything Bagel from Pampered Chef. Both were AMAZING!!
Jen Talley says
Hi Jane! Thanks! I'm thrilled that you loved the bagels!
Kristin Cipes says
My first bagel recipe!! My dough looked nothing like yours but I added more flour while kneading and tried to trust the process! They came out like my favorite bagels feom my childhood at a bagel shop that has since closed down! YES!!!
Jen Talley says
Hi Kristin! Thanks for the review. I'm so happy that the bagels reminded you of the bagel shop you loved as a child. Thanks for sharing 🙂
Erica says
Hi there. Do you know the nutritional value for each bagel? Like the macronutrient breakdown?
Denise says
I absolutely love your bagel discard recipe!! I do have one question though. Have you ever froze the bagels after you shape them and then just take them out of the freezer into the water bath and into the oven when you need them? Thank you!
Melanie Nunyabiz says
I am so excited to try this … but it came out sticky … I let it proof for an hour too .. any suggestions??
Caitlin Bell says
I make this recipe every other week for my family, and a bunch in advance to freeze for our annual beach trip. This recipe has made me bagel-famous in the family! It’s a keeper!!
Erika says
Hi there! These bagels are AMAZING. By any chance do you know the nutritional value or macronutrient breakdown of each one?
Kristin Rancourt says
I've used a different recipe in the past, but tried this today for the first time. It is EASY and DELICIOUS! I think this will be my "go-to" recipe going forward.
Jen Talley says
Thanks for the review Kristin! I'm so glad you enjoyed the bagels!
Marianne says
Wow, just realized I've been making this recipe consistently for over a year now. I love this recipe. Made another batch today. The bagels are excellent.
Jen Talley says
That's awesome Marianne! Thanks for coming back to tell me!!
Marianne says
I love this recipe. Ive been making these bagels consistently over a year now. They are always a hit. So easy to make and better than store-bought. Just whipped up a batch in the middle of the night.
Julie says
I’ve been making these bagels weekly now for several years. They turn out perfect every single time. The best bagels we’ve ever had. I’ve shared this recipe with friends who also make this recipe all the time. Thank you for sharing this amazing recipe! I don’t think we can ever go back to store bought. These are incredible.
Victoria Burger says
Please note this recipe actually makes 12 normal sized bagels. Otherwise it is a perfect recipe for me thank you.